Giant Bomb
The Giant Bomb is one of many Traps in the Clash of Clans game.
When you’re looking for a Big Boom, you need the Giant Giant Bomb.
Description
Explodes when an enemy comes into proximity. Essentially a much more powerful (and expensive) version of the Bomb. This creates splash damage to all enemies within a 3-4 tile radius, depending on the Giant Bomb’s level.
If you love using Giant Bombs and you want to get a good amount of Troops with it, place it where you commonly see a large amount of Troops deployed when you are being attacked.
Once activated, Traps must be re-armed in order to be a part of the next defensive Layout.
Although Hog Riders are the “preferred targets” of Giant Bombs, the bomb will still be triggered by (and damage) any ground troops that venture into its range.
Giant Bombs of all levels deal enough damage to instantly destroy all Tier 1 troops and Wizards, regardless of their level.
Base Features
| Building Size: | 2х2 Title |
Favorite Target: | Hog Rider (x 1.5) |
|---|---|---|---|
| Trigger Radius: | 2 Titles |
Targets: | Ground Only |
| Damage Type: | Area Splash |
Available to Build
| Town Hall Level | 1 | 2 | 3 | 4 | 5 | 6 | 7 | 8 | 9 | 10 | 11 |
|---|---|---|---|---|---|---|---|---|---|---|---|
| Number | 0 | 0 | 0 | 0 | 0 | 1 | 2 | 3 | 4 | 5 | 5 |
Upgrading Changes
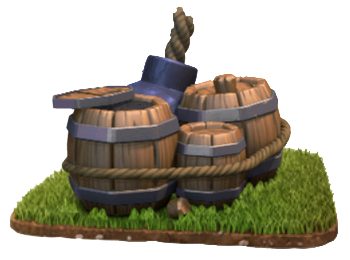
When first placed, the Giant Bomb consists of a single big Bomb tied together to three barrels of gunpowder with a single round of rope.
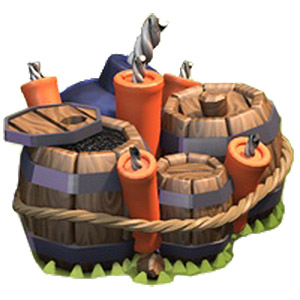
At level 3, several sticks of dynamite are placed between the barrels of gunpowder.
Visual Differences (swipe images right and left)
Giant Bomb Upgrades (swipe table right and left)
| Level | Damage | Damage to Hogs | Damage Radius | Re-Arm Cost | Town Hall Level | Upgrading Cost | Upgrading Time | Experience |
|---|---|---|---|---|---|---|---|---|
| 1 | 175 |
262.5 |
3 Titles |
2,000 |
6 | 12,500 |
Instantly | 0 |
| 2 | 200 |
300 |
3.5 Titles |
3,000 |
6 | 75,000 |
6 hours | 146 |
| 3 | 225 |
337.5 |
3.5 Titles |
4,000 |
8 | 750,000 |
1 day | 293 |
| 4 | 250 |
375 |
4 Titles |
5,000 |
10 | 2,500,000 |
3 days | 509 |
| Total: | 3,337,500 |
4 days 6 hours | 948 |
|||||
Interesting Facts

When the Giant Bomb explodes, it leaves a black scorched mark in the grass, similar to the Bomb. However, the scorch mark lasts for about 1 minute and 40 seconds, compared to that of the Bomb, which lasts only a few seconds.
A very weird fact is that upgrading to level 3, which adds dynamite sticks, is the only upgrade that doesn’t increase its explosion radius.
Defensive Strategy
A Giant Bomb takes up the same amount of space (2×2) as a Hidden Tesla. If you have multiple places where your Hidden Teslas could spawn, placing Giant Bombs in the others can be an effective strategy. Your enemy may decide that the area is safe once they do not trigger a Hidden Tesla, then spawn additional Troops which will all be blown up by the Giant Bomb.
Be cautious when upgrading the Giant Bomb, as this will reveal its location to future attackers. Combat this by relocating it during the upgrade period. As with any other trap, Giant Bombs cannot be triggered during an upgrade.

Some players place their Giant bombs on the outside of their bases, to ensure that troops will trigger them early, helping to prevent 50% destruction. The best place to put outside Giant Bombs is behind external buildings, but in front of external walls. This ensures that troops will get grouped up while destroying the external building, after which the bomb triggers, destroying many troops at once.
Other players prefer to place the bomb further into their bases to act as a trap for Hog Rider and Giant groups. Placing them between two Defensive Buildings ensures that the giants and riders will be closely grouped before triggering the bomb.
A pair of Giant Bombs, detonated together, will incinerate any level of Hog Riders and can be used to wipe out an entire pack. Place them between Defenses to maximize the possibility of destroying a large group of Hog Riders.
At Town Hall 9 and above, it is best to place Giant Bomb pairs away from the Archer Queen. At this level players will seek to eliminate the Archer Queen before releasing their mass of Hog Riders, and will trip any Giant Bombs on the path to the Archer Queen rendering them useless later when the Hog Riders are deployed.
Offensive Strategy
Because Giant Bombs deal 50% more damage to Hog Riders, it is vitally important for those employing Hog Rider attacks to deduce where Giant Bombs may be placed and attempt to avoid them. If the Giant Bomb has a higher level than the Hog Riders in the attack then the Giant Bomb can instantly destroy an entire group of Hog Riders, preventing Healing Spells from being able to revive them. One should watch out specifically for 2×4 empty spaces placed between base defenses, if a pack of Hog Riders trips two Giant Bombs next to each other they will be instantly destroyed.
A Golem and Hero based mini-army is effective at detonating dangerous Giant Bomb pairs before releasing an army of Hog Riders. One should aim to detonate as many Giant Bomb pair locations as possible while destroying the defending Heroes.
Try to trigger them with a single Barbarian if you can; drop them one by one near 2×2 spaces in an attempt to trigger them as to prevent further losses in your army.
Control Elements
. . .

Leave a Reply